Support
Grazitti’s custom connectors for Alteryx empower end users to
upload and download data directly into/from Alteryx.
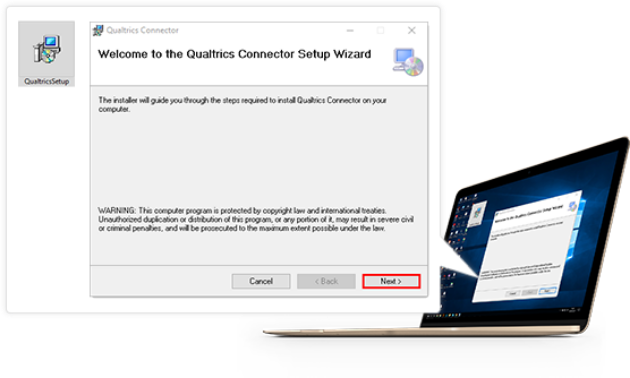
Steps to Install
In order to use the connectors, users first need to install it on their system.
Users can either purchase the connector and get a full version, or a trial version. The trial version of connector will last for 14 days.
After purchasing the connector or registering for the trial version, the user can download the connector’s installation package directly from their browser. License Key for the connector will be sent directly to the registered email address of the user.
Minimum System Requirements
- Alteryx should be installed on the system. The connectors are best compatible with Alteryx 11. They may or may not work perfectly with older versions.
- The system should be connected to the internet to use the connectors for downloading data.
Entering the Licence Key for First Time Users
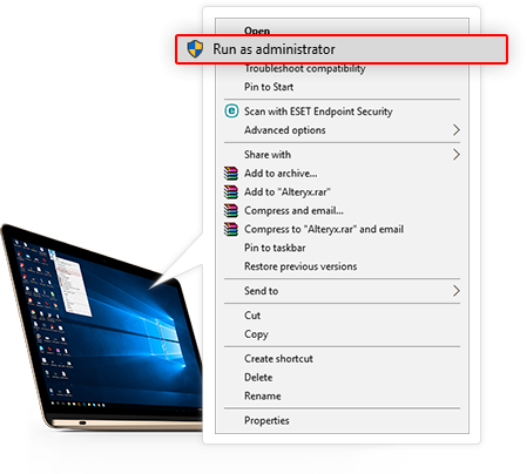
Launch Alteryx as an Administrator
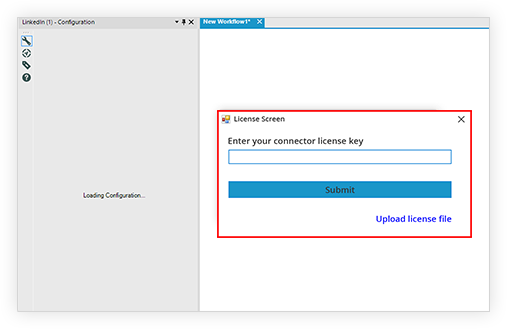
- Drag and drop the connector on the canvas. The license window will pop-up automatically.
- Copy the 16-character alphanumeric license key received on the registered email address and paste it in the Enter Your Connector License Key window.
- Click Submit to activate the connector. The system needs to be connected to the internet for activation process.
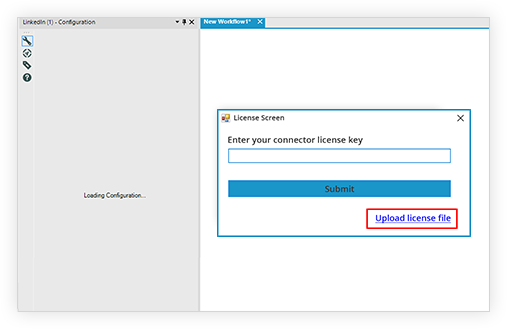
Click Upload License File.
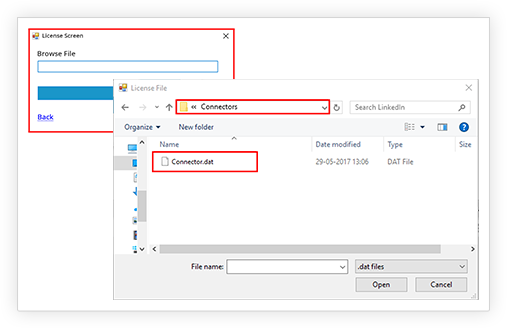
Click browse and then select the .dat file and click Submit.
In case user faces issues with the license key, they can contact support and get a .dat file. Save this file in your local system as it will be used to activate the connector. Users need to follow the below-mentioned steps to activate the connector using the .dat file:
Troubleshooting Tips
1. The Connector is not showing after installation
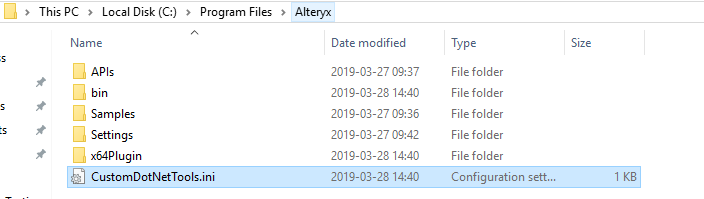
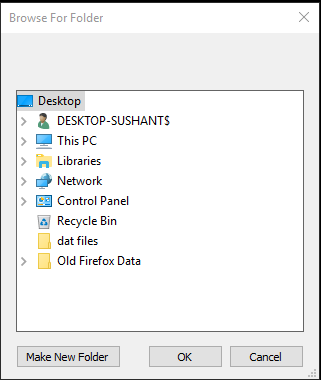
- Locate the path where Alteryx is installed. This screenshot would help you locate the path of Alteryx (Only Selected Path).

- Place the CustomDotNetTools.ini file in that location.
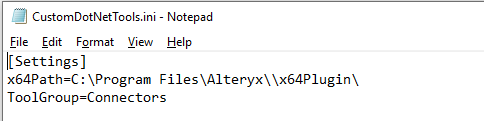
- Right click on the CustomeDotNetTools.ini file and select edit. A notepad will open.

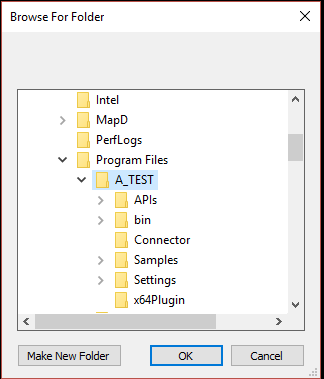
- Please make sure the path for x64Path is correct as per the location of the folder. Once corrected, close the file.
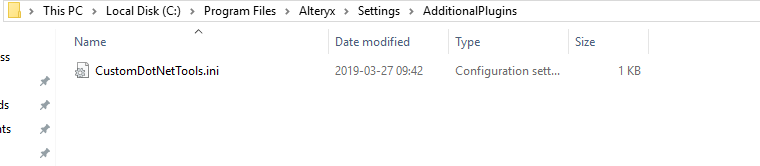
- Under the same location (Alteryx Folder), double-click on settings, then double-click on AdditionalPluggins.
- Paste the CustomDotNetTools.ini file again in the above mentioned folder.

- Right click on the CustomeDotNetTools.ini file and select edit. A notepad will open.
- Right click on the file and click Edit. Make sure the path is the same as given in the screenshot below.
- Restart Alteryx and your connectors would be there.
2. The Logo of the connector is not appearing while opening a workflow on a new system
An Alteryx workflow containing the connector can only be used on a system which has the connector installed in it. If the system does not have the connector installed, the connector will not function and a question mark will appear in place of the connector.
3. Field not selected error
This error will appear when either the Report Type or the Fields to be extracted are not selected. You must select at least one option for each.
4. License Key is not working
Check the expiration date of the license key. The user needs to ensure that the key has not expired or has been used before, as a license key can be used only once.
5. Windows is showing a warning message
In some Windows versions, you may see a screen like the following one when trying to install the connector: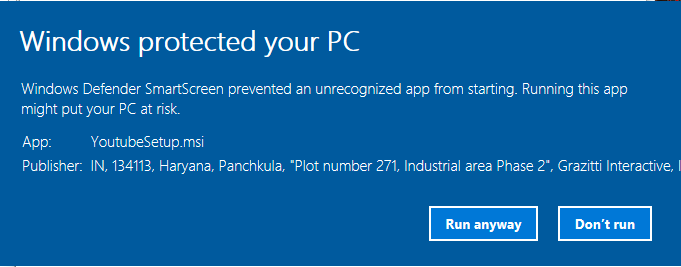
Please click “Run anyway” to continue installation of the connector. There will be no risk to your PC as the product is verified and digitally signed by Grazitti Interactive.
This is just Windows default behavior called “Windows Defender SmartScreen” which warns the user about any new publisher.
6. How to make the connectors tab visible
- Right Click on Alteryx and click on ‘Run as administrator’.
- Click on the + sign.

- A dialog box will open for configure tool palette.
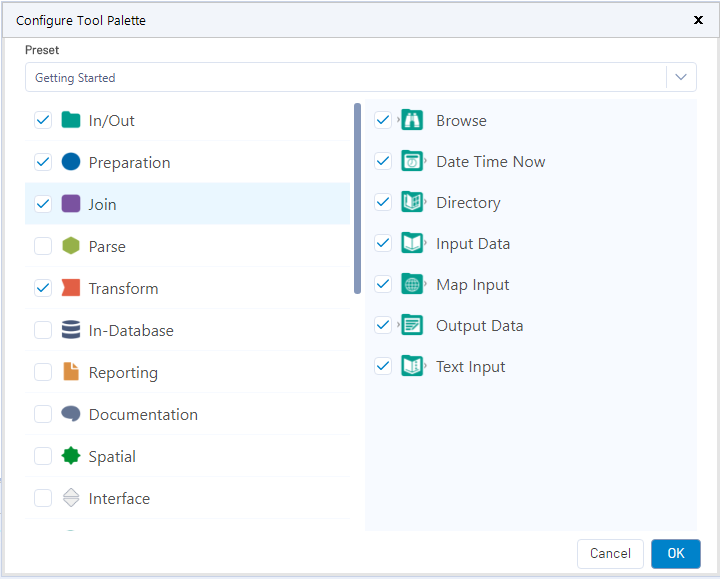
- Change the Preset to All and click OK

- Look for the connectors tab in Alteryx and select the Connectors Tab.

- All Grazitti connectors will be shown in the Connectors tab.
7. Support
Contact [email protected] for any other issue related to the connector.
Possible Installation Errors
Incorrect installation path
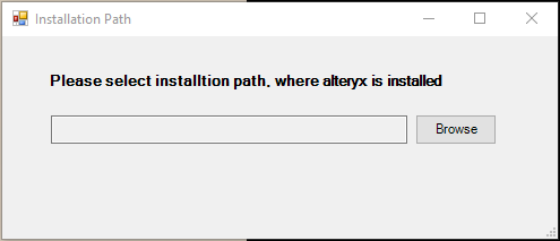
There may be a case when you see the below dialog box. It indicates that the installation process is not able to locate the Alteryx Folder.
Connector Installation
2. Notice the Path before ‘bin’
This path is where Alteryx is installed on the system. There is a possibility of Alteryx being installed in the AppData folder. In that case, here is how you can resolve it.
4. Select Path
After clicking the Browse Button, another window will pop up.
5. Select Folder
Select the folder using the Path mentioned in Properties of Alteryx, mentioned in the above steps.
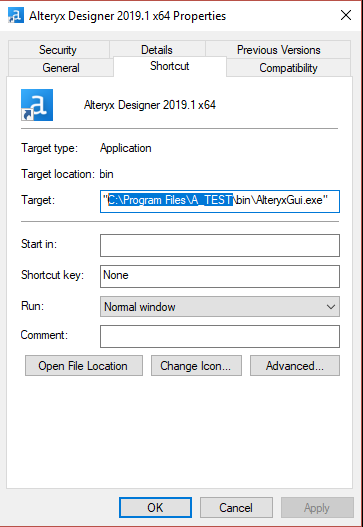
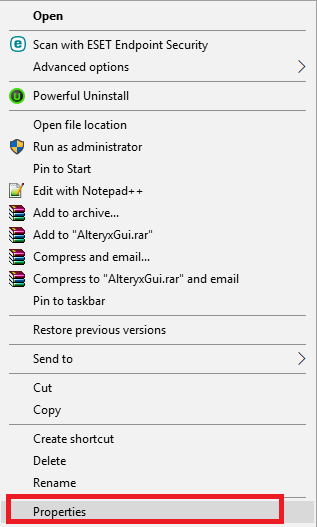
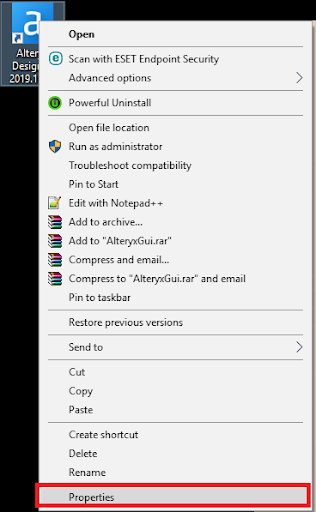
- 1. Right click on Alteryx and Select Properties
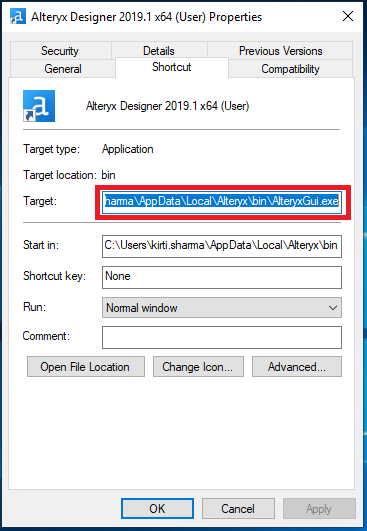
- 2. Notice the Path before ‘bin’
- 3. Now Click on the Browse Button
- 4. Select Path
- 5. Select Folder
This path is where Alteryx is installed on the system. There is a possibility of Alteryx being installed in the AppData folder. In that case, here is how you can resolve it.
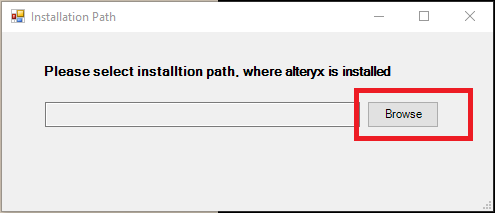
After clicking the Browse Button, another window will pop up.
Select the folder using the Path mentioned in Properties of Alteryx, mentioned in the above steps.
Once you select the folder, Click Ok. Your will get installed at that location.
If you still face any issue, email us at
[email protected]
How to Migrate to Alteryx Version 2019.1 From Any Previous Version of Alteryx
Follow the following steps
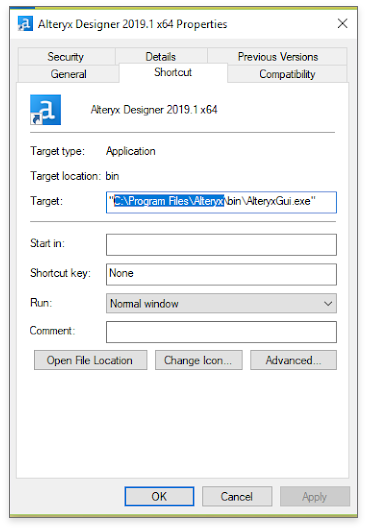
- Right click on the current version of Alteryx Designer and Select Properties.
- Copy Target Location. Usually, it is “C:Program FilesAlteryx…”
- Go to Control Panel, then go to Programs and click on Uninstall Alteryx.
- After the uninstallation, go to the Target Location, till the Alteryx Folder.
- Select Alteryx Folder and Delete the folder.
- Now Install the latest Version of Alteryx i.e. Alteryx 2019.1. You will no longer have the error.
Error After installation Alteryx Version 2019.1
After Installation of 2019.1 Version of Alteryx, If the user is getting the error mentioned below, please follow the following steps to resolve it.
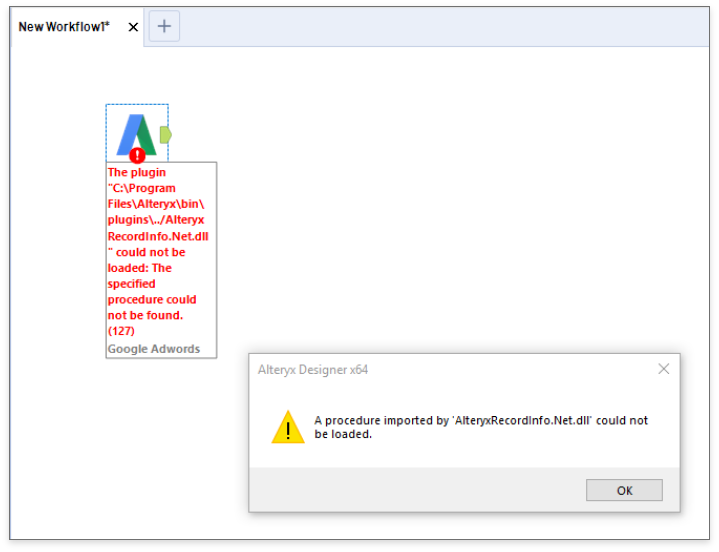
If the user has already installed Alteryx 2019.1 and facing the Error follow the below mentioned Steps.
- Go to this link, download the file and copy this file
- Right click on the current version of the Alteryx and select Properties.
- Notice the Target location. Usually, it is “C:ProgramFilesAlteryx…”
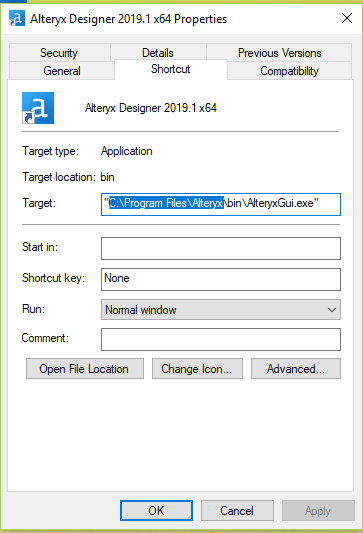
- Go to the location, open Bin Folder.
- Paste the copied file and replace the existing file.
If you are still facing an issue, please contact [email protected].
Steps to Uninstall the Previous Connector

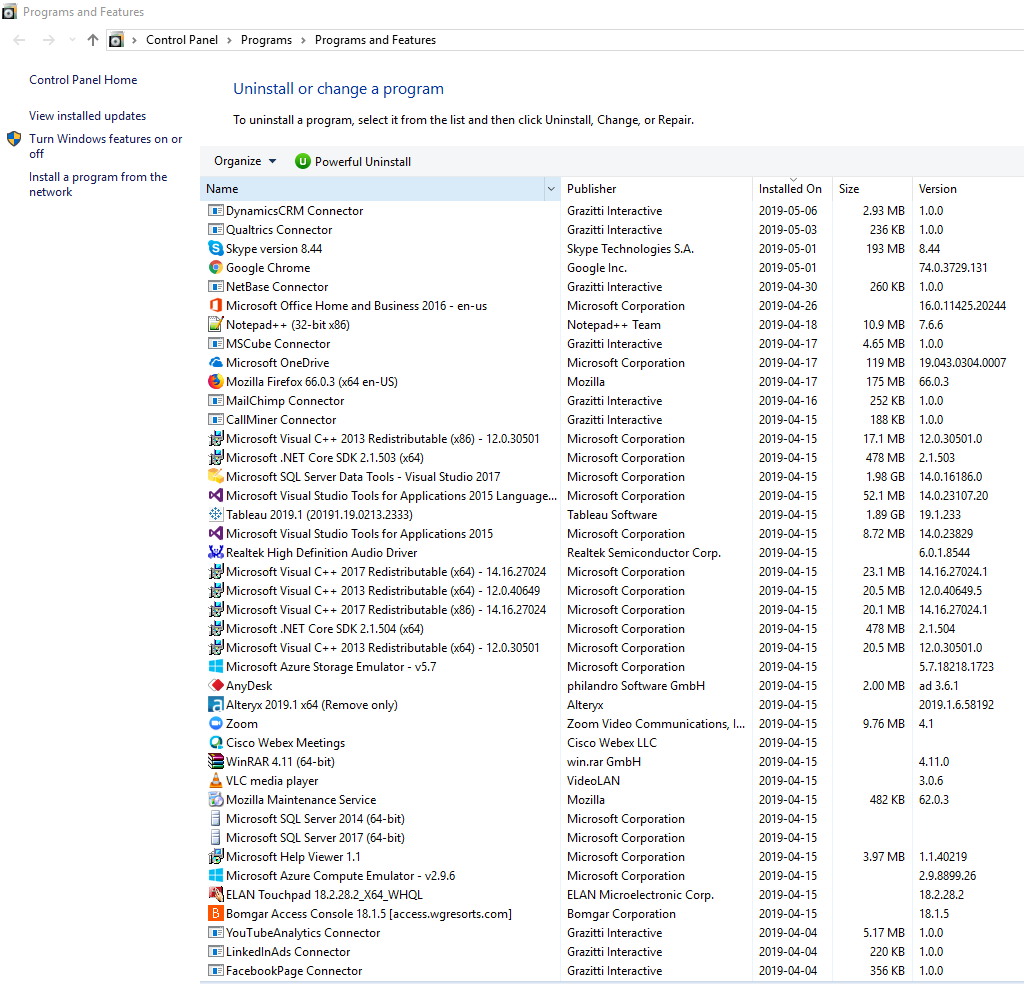
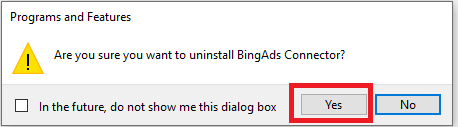
- Once the process is completed, refresh the programs and features window.
- Install the updated connector by double-clicking on the latest connector MSI file.
Alteryx is installed in Appdata folder and folder is hidden
In some cases, while installing the connector, we are unable to access the connector’s location. This is because of the connector being installed in the AppData folder. To overcome this issue, follow the following steps
1. Check the correct path
Check the correct path where Alteryx is installed by right-clicking the Alteryx Designer. Next, select Properties.
2. Notice if the Target
Notice if the Target path contains the AppData folder.
3. Access this location
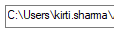
Now Access this location before AppData folder.
4. Notice that the AppData folder is not visible
Notice that the AppData folder is not visible.

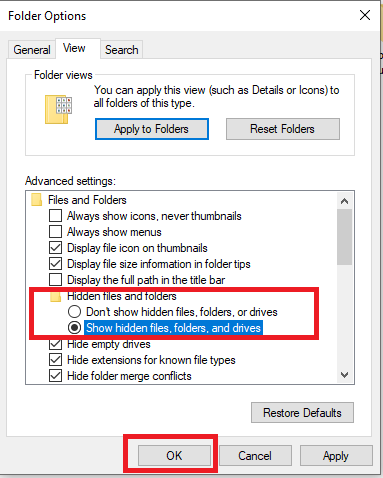
5. Change folder and search options
Go to File and click Change folder and search options.

6. Show hidden files, folders and drives
Go to the View tab and check Show hidden files, folders and drives and then click ok.
7. Now AppData folder is partially visible
Now AppData folder is partially visible. Right-click on the AppData folder and select Properties.

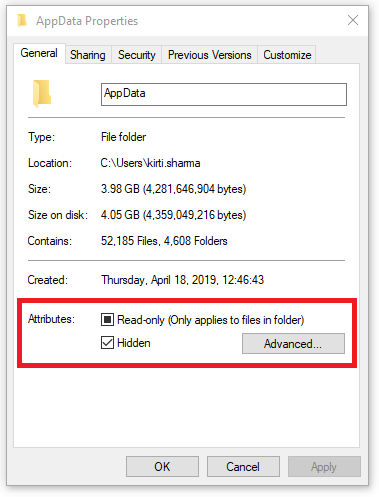
8. Uncheck Selections
Uncheck both Read-only and Hidden check boxes.
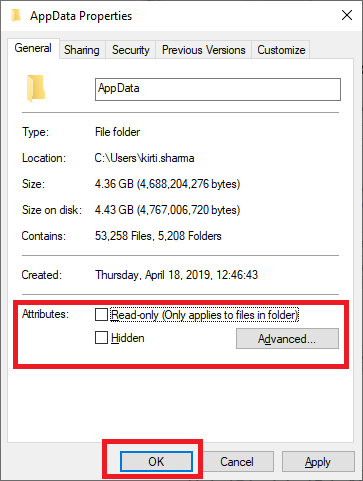
9. Click OK
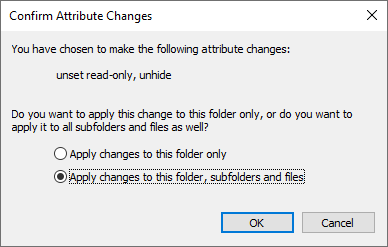
It should look like the screenshot below. Now, click OK.
10. If You are facing error issue
Once you click OK, it shows a pop up asking for unhiding the subfolder – Check Apply changes to this folder, subfolders and files and click OK.
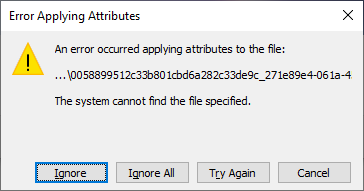
11. Now AppData folder is partially visible
During the process, an error message might show up If you encounter such a message, then click Ignore All.
- 1. Check the correct path
- 2. Notice if the Target
- 3. Access this location
- 4. Notice that the AppData folder is not visible
- 5. Change folder and search options
- 6. Show hidden files, folders and drives
- 7. Now AppData folder is partially visible
- 8. Uncheck Selections
- 9. Click OK
- 10. If You are facing error issue
- 11. Now AppData folder is partially visible
Check the correct path where Alteryx is installed by right-clicking the Alteryx Designer. Next, select Properties.
Notice if the Target path contains the AppData folder.
Now Access this location before AppData folder.
Notice that the AppData folder is not visible.
Go to File and click Change folder and search options.
Now AppData folder is partially visible. Right-click on the AppData folder and select Properties.
Uncheck both Read-only and Hidden check boxes.
It should look like the screenshot below. Now, click OK.
Once you click OK, it shows a pop up asking for unhiding the subfolder – Check Apply changes to this folder, subfolders and files and click OK.
During the process, an error message might show up If you encounter such a message, then click Ignore All.

